Faculty Grade Submission Instructions

Faculty Grade Submission (FGS) is Yale’s system for accessing official course rosters and entering/submitting final course grades. Below are instructions for the many functionalities of FGS.

Contents

  1. Login
  2. Unauthorized User Login Error Message
  3. Welcome Page
  4. Course List
  5. Term Widget
  6. Enter Grades
  7. Optional Writing Credit for Students Enrolled in YC Courses
  8. Save Grades (Autosave)
  9. Submit Grades to Registrar
  10. Print/Export Class Roster
  11. Grade Upload
  12. End of Term Report/Individual Study Evaluation
  13. Forms
  14. Logout
  15. Residential College Dean’s View

Login

Login to the Faculty Grade Submission (FGS) application (https://fgs.app.yale.edu/).

Click on Log into grade submission to login.

Enter CAS credentials to login.

Unauthorized User Login Error Message

If you are not setup as an instructor or proxy, you will receive an Unauthorized User error message. Contact your school’s registrar if you receive this message and believe you should have access.

Welcome Page

The Welcome Page is presented to the logged in user after logging in.

An option to bypass the Welcome Page is available by checking the box next to Don’t Show this page again.

Click on Continue.

The Welcome Page is bypassed if the user chooses to enable the Don’t show this page again option.

Course List

The Course List displays only those courses the instructor/proxy user is authorized to view. The display defaults to the current term.

Term Widget

The Course List defaults to the current term. The Courses for term drop down includes all terms in which the instructor has taught at Yale. You may view rosters and previously submitted grades by selecting the appropriate term.

Enter Grades

Click on the course number under the Course column from the Course List page to enter grades for students.

A grade distribution graph, total enrollment statistics, and grade modes are displayed in the top section of the page.

Grades are saved immediately after entry, and the Save Date column is updated with the date and time of last entry.

All columns on the Grade Entry page are sortable except School Grade Policy.

Available grades in the Grade drop down are based on the grade mode for the school in which the student is enrolled.

Optional Writing Credit for Students Enrolled in YC Courses

If there are students in the course who chose optional writing distribution credit, a YC Opt Dist Cred column is added to Grade Entry page. Select the appropriate option for each student from the drop down.

Save Grades (Autosave)

Grades are auotsaved immediately upon selection from the Grade drop down, and the date and time of the save is recorded in the Save Date column.

If the Grade field value is changed to be blank before submitting, the Save Date data for that row is removed.

Submit Grades to Registrar

When grades are ready to be submitted to the Registrar, click on Submit Grades to Registrar on the Grade Entry page.

Check the box for the school(s) for which you wish to submit grades.

Once grades are submitted to the registrar, they cannot be changed in FGS. Contact your school’s registrar for grade change instructions.

The drop down in the Grade column will no longer be available for the students whose grades have been submitted.

Print/Export Class Roster

Click on the Print Roster link from the Grade Entry page.

Class rosters may be exported as either an Excel file or as a PDF. Click either Export as Excel or Export as PDF.

File names are defaulted to include term, subject, course number, and section details.

To print, open the file and print from the application in which the file opens.

Note: Excel files contains two tabs/sheets: Class Roster and Course Info. This file can also be used for the grade upload option outline below.

Grade Upload

Grade Upload is a new feature added to FGS.

Excel and CSV are the only valid file types for upload. The Class Roster excel file (per above) can be used as a template for upload.

To upload grades, click on Upload from the Grade Entry page.

Step 1: Select spreadsheet

Choose a file for the upload, either drag and drop the file or select from your computer. You can use your own spreadsheet or the spreadsheet downloaded using the Export as Excel option above. Note: If you use your own spreadsheet, it will need to include the SID or NetID for each student in order to be mapped in the following steps.

Step 2: Select sheet within spreadsheet

Select the worksheet from the file which contains the grades. If you used the Epxort as Excel option above, this is the worksheet named Class Roster.

Step 3:  Select columns within sheet

Map columns from the file to Student ID and Grade values for upload. These two fields are required for mapping. First Name and Last Name mapping is optional but recommended.

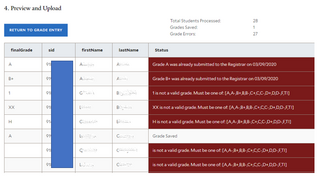
Step 4: Preview and Upload

Review uploaded values as mapped. Click Upload Grades.

After submitting, a Status column displays any errors from the grade upload.

To correct errors, you can either repeat the process and upload a new file for the rows with errors, or you can manually add grades for the rows with errors through the Grade Entry page.

Once grades are successfully submitted through the upload process, you cannot make changes to the grades through FGS. Contact your school’s registrar for instructions on changing grades that have been submitted.

Common upload errors incude:

  • Final grade value missing/blank
  • Invalid grade mode (the grade entered doesn’t match the grade options available for that student)
  • Gades have already been submitted to the registrar

End of Term Report/Independent Study Evaluation

An End of Term Report or Independent Study Evaluation can be submitted for students by choosing End of Term Report/ Ind Study from the Grade Entry page.

Click on the document icon in the EOT Report column next to a student’s name. Select a reason and enter comments.

The primary instructor’s name is defaulted in the Submitted by instructor/ On behalf of instructor field.

Click on Submit once the report is ready to send to the student’s Residential College Dean.

A confirmation of report saved pops up.

The EOT Report column icon for the student will change indicating the report is submitted. It can be edited and resubmitted if needed.

Independent Study Evaluations are submitted using the same process above, but by clicking on the icon in the Individual Study column instead.

Forms

A Forms page contains grade change request forms for some schools. A grade change form should correspond with the school in which the student is enrolled, and not the school from which the course originates. You can find the student’s school listed on the Grade Entry page. If a form does not exist for the school, please contat the school’s registrar for instructions on changing grades.

Logout

Clicking on the Logout button brings users back to the login page. Sessions automatically end if the application is left inactive for more than 15 minutes.

Residential College Dean’s View

When a Residential College Dean logs into FGS, the system takes them to a reports screen by default, displaying a list of reports submitted for students in their residential college. This list is sorted in descending order by Term Code and ascending by student last name. 

After login, users with RCD/RCDAA access are brought to the Report List screen showing a list of End of Term (EOT) / Independent Study Evaluation (ISE) reports. The default Status is Unread.

Report List Screen

The Report List screen shows a list of reports submitted for the students in that residential college, along with some other information about the student so that the RCDs can distinguish between two students with similar or same names. 

The default sort order is: 

  1. status (ascending, so the newest reports always show first) 
  2. term code (descending) 
  3. student name in “last name, first name” format (ascending) 
  4. course (ascending by the concatenation of subject code, course number, and section number) 
  5. submitted on date/time (descending, so the most recent one shows first) 

The columns for the Report List are sortable by double clicking them.

Clicking on the report icon under the View Report column will open the EOT/ISE report in a new window with options CLOSE and PRINT.

Once the report is read, the status for the report changes from Unread to Read.

Reports can be filtered by Status and Term.

PDF Export and Printing

Click the PRINT button to open the reprot as a PDF document in the browser. 

From there, you can use the built-in browser tools for PDFs to either save the document or print it out and place it in the student’s file in the RCD’s office.